So I've been slowly progressing in my picture taking I think. As with everything, I can never do anything half way and I've been wanting to see if I can take decent pictures and I've a bit of artist flair in my blood.
About a month ago I was researching taking pictures for ads... you know ebay type stuff and I was wondering how some people can take such nice pictures. I saw you pretty much need a light tent to get the right lighting. I looked up the prices and was aghast at how much they wanted for some cloth covered wire frames!
So I did a bit more research and found this article link:
How to Make an Inexpensive Light Tent - DIY
So with about 20 bucks in my hand I went to town and picked up everythign I needed. Made my own light tent and for the last few weeks I've been monkeying around with it.
I think I'm starting to get the hang of it... here's my progression...
1st. picture I ever posted:

Then another attempt without a light tent using natural sunlight:
.jpg)
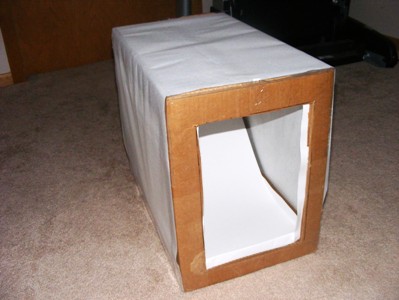
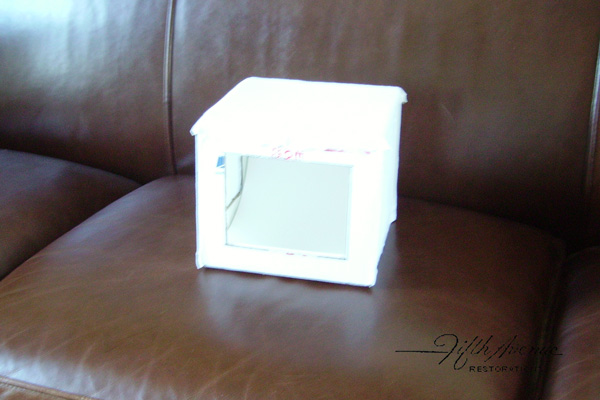
Got my Light Tent Made:

Now after some practice and adding some color:
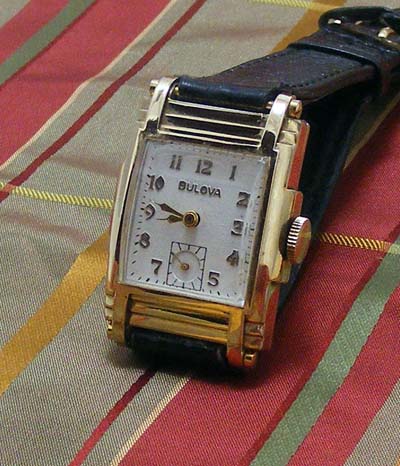
Updated 2012... I think only getting better with time and practice.
Now while I won't remotely profess that the last set of picsof the Corrigan look in any way professional.... I think they look pretty darned good. Decent pictures like these really showcase this and other gorgeous looking old Bulova's.
Anyone can do it... heck look it me!
What say you gents?
In reply to I agree with admin (he's one by Stephen Ollman
Thanks man... yeah I was a little spooked about messing with the hands but it turns out it wasn't as spooky as I thought.
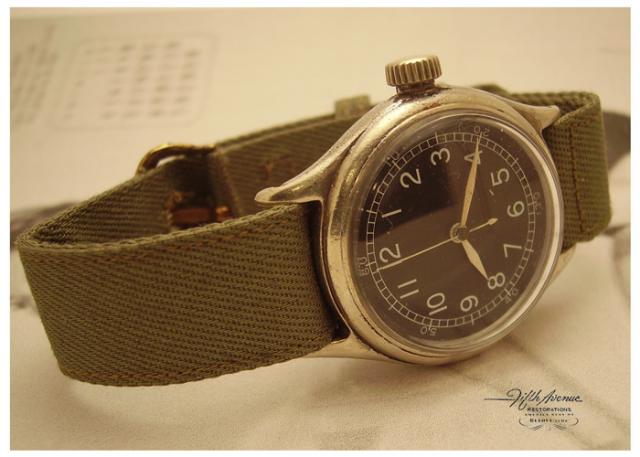
I'm really liking how the pics are turning out. I went to a fabric store and found that fabric underneath the watch in their old samples for $2.00. I think it looks nice and manly while maintaining a classy feel. I may start using it for all my watches. I like the color scheme on it with the gold watches.
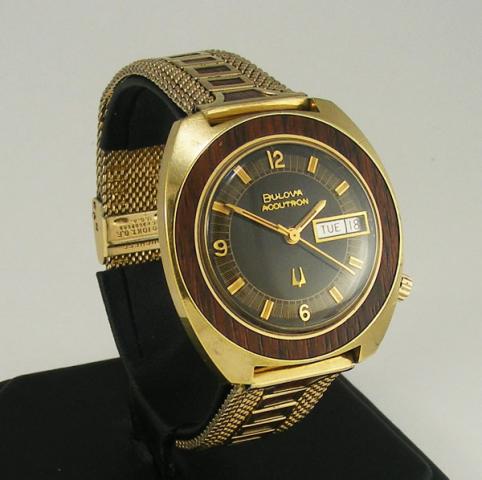
And yeah... how do you like love a Corrigan... it's pretty much what an old watch from the 30's "should" look like.
.png) Hrm... here's the before. Not horrible really... just needed a better polish and the right hands... oh and some pictures taken with a spiffy light thent!
Hrm... here's the before. Not horrible really... just needed a better polish and the right hands... oh and some pictures taken with a spiffy light thent!In reply to AH.... so you guys DID pay by plainsmen
I will be making a light box some time this year after seeing the difference the light box has made to your photos. Does the the box have to be as large as the one on the site you linked us to? What are the demensions of your light box? Thanks for posting the link.
Bob
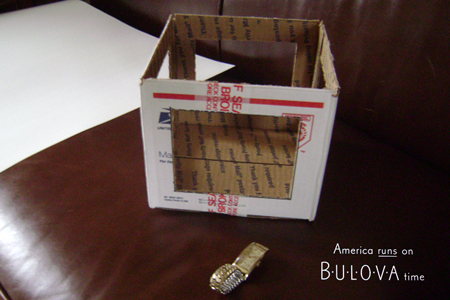
Made mine from a recycled 7" x 6" square USPS priority mail box and used a 1" indent for the cutouts making the finished holes 5" x 4".
It's sturdy, what I had and couldn't beat the price!
The smaller dimension is going to make portability and storage easy and also cut the Poster board needs down to one sheet.
Total investment so far .38c +tax
Now if I can find the glue....
In reply to Made mine from a recycled 7" by FifthAvenueRes…
Thanks Mark for the demensions. I have to find a box that will accommodate a piece of 8-1/2 x 11 paper. I like to shoot my watches with a photo background for my website. I'm thinking of buying a new camera as I'm sure my daughter is getting tired of me borrowing her's. Probably should get a cheap tripod too.
Bob
Mines 12" x 20" x 16"....
I don't know that you really need it huge. I think it's going to be subjective on what your taking pictures of. I made mine just out of a box that I had in the garage. Like Mark I'm a big proponent in using what you have on hand.
But I think you have to remember that even though my box is 20" long... I only have less than half of that to put stuff on because of the "eternity" tagboard inside giving it that far away look. So my advice is to make sure to give yourself some room inside.
In reply to Mines 12" x 20" x 16".... by plainsmen
I use a home made lightbox that has worked very well for me. Try and stick with backgrounds that are not too busy. Watches will always photograph better with the crystal removed. If possible shoot with a camera that lets you override some of the automatic features.
Ok Guys!
I have to start taking photos of my watches. I have never had an interest in photography at all, except looking at them.
As for the light box, it looks easy enough to create. My questions are about lighting:
What do you use for a light source?
Flourecent or incadescent?
Where do you place the light when shooting pics in the light box.
Is it inside or outside the box?
In reply to Ok Guys! I have to start by Wayne Hanley
Home depot... just some little can lights on stands for each side... one of those clip on lights for the top..
I use those energy saver lights that look like a thin tube swirled into a shape like a light bulb... the "Natural Daylight" kind. I find them to be the most honest without giving such a yellow tinge.
Lights outside of the box. That's why that craft clothy type paper you use for the outside is somewhat transparant.
I use a regular old desk lamp like the one below hovering over the top - bulb is a GE 'Reveal' indoor floodlight and the craft clothy paper was an old White Cotton T-shirt cut up.

by using things I had laying around the total cost to build was less than $10, bulb was the majority of the expense and it works like a charm....fun to build too.
Thanks once again for the light box tip Jerin, best couple of hours I've ever invested.
In reply to I use a regular old desk lamp by FifthAvenueRes…
Yeah the top light I use is pretty much like your desk lamp here, other than instead of a base at the end of the bendable arm, mine is a clip. My box was a bit higher and I find I can adjust the height a little better if I can just clip it to a bookshelf or whatever.
Well, I've never gone to a light box. Tried one but didn't have much luck with it. Probably just didn't mess around with the camera settings enough. I still prefer my black background and woodgrain watch box.
After months of fiddling with the camera I got it to a point where It's better than most and I'm happy with the pics I get.
In reply to Well, I've never gone to a by bourg01
In reply to Yeah you do a good job... by plainsmen
In reply to hey Dude, Your pics look by bourg01
In reply to hey Dude, Your pics look by bourg01
I use a light box of sorts with parchment paper on the top and sides. I use 3 lights, a clip-on on top and one on each side, all 3 have reflectors to concentrate the light. I use standard bulbs and set the camera for artificial light.
Jay
In reply to I think yours are always by plainsmen
Thanks. The problem I have been having lately is the image quality has been deteriorating gradually over time. I've been told that this happens to digital cameras. It's definately happening to mine.
Jay
In reply to Thanks. The problem I have by vintagebulova.com
bourg, the best thing about the light box is that once you spend and hour or so building it, you have a very consistant and easy to duplicate setting, saves time in the long run I think, as you dont have to fiddle around to get things just right . Once you build it, use it a time or two and you have a repeatable setting for light, just add a background and ur done.
I built mine in less than an hour for about $15 or so. Now I just clip the light on put the background in, set up the watch pop the camera on the mini tripod and shoot... 5 mins and I am rolling !
Jerin's post with the link should be pinned to the top of the Add a watch, What is it, and General Info forms, because "a good picture is worth a thousand words" and this info is priceless in trying to ID any watch. You don't need to spend big bucks to get quality photos, just some time and effort, and some trial & error.
I bought one of those 16" X 16" light tents on the bay a few years back, and it has work quite well for me, it is open in the front for bigger items and it came with the halogen lights, small tripod, and different colored backgrounds, it folds up and is contained in a briefcase style soft carrying case, it also cost me around $50.00, Using the info that Plainsman has provided will get the same results for under $10.00 (just look at his photos)
I go to our local Hobby Lobby for different backgrounds (scrapbooking section) and use them with a mirror for different effects.
It is a lot of fun experimenting with different shots, effects, background and lighting, some times I take 20-30 pictures of a watch only to get maybe 3 or 4 good ones...LOL! I blame it on my 6 year old Fuji camera. (next $300 upgrade) : (
although you can't tell from the photos I'm putting up recently..... I find to get "true color" I first do some post processing rather than relying on the camera's preset white balance function. I have a true white non-reflective surface (very white printer paper can also be used, but not the reflective glossy photo paper). I make sure it's in my cardboard light box within the field of view, and crop it out afterwards. Or if using white paper for a background, if it's really white, you can just use that. After taking pic, I open photoshop and the image, go image> adjustments > curves, and a gui opens up like below:
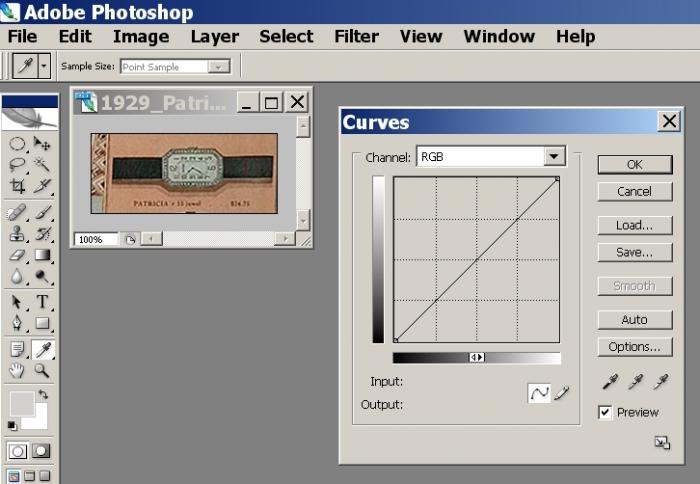
Click the little eyedropper on the right and then click that eyedropper in the image where the "pure white" color is.
Another easier solution is, after doing this a few times, I know how "white" my white paper is, and can just save a custom white balance setting in my camera focused on this white area, and not have to post process any more. The consistency of the light box makes this custom camera setting work real well....and colors are quite true. Even after doing this, end users "see" colors etc based on their display settings, but that's way overkill and I anit losing sleep over that.
Not all Cameras have a White balance setting, the DSLR's do but many of the point and shoots do not. My images are taken with an old point and shoot Pentax Optio 60 (6 megapixel) in the USPS light box, which needs side lighting. Macro setting on a tripod. No enhancements with Photoshop although Photoshop is used to zoom / crop to make a final image.
Not Pulitzer prize winning, but consistant.
looks good to me. If your using photoshop anyway, you can save the white balance/curve adjustment setting and have the adjustment done on every photo you open, without having to go through the steps after a couple times.... but your photos are fine. It's overkill on my part.
In reply to looks good to me. If your by William Smith
Do photoshop at the end as well. Sometimes the light just won't illuminate something right, but mostly it's cropping and centering I do with the program.
As with anything it takes practice. Sometimes I've worked on some pics and just dumped them and started over because I thought it looked just to over processed and didn't capture the watch correctly.